
Why Siding Upgrades Matter So Much in Mount Pleasant
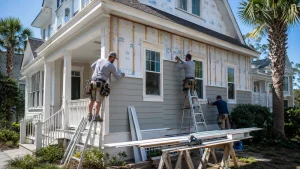
Siding is the first defense against all of it. When it fails, the damage moves quietly into the sheathing, framing, and insulation behind the wall. This guide walks you through the full siding installation process, step by step, so you know exactly what to expect from your first estimate to the final trim board.
What Siding Installation Actually Involves
Siding installation is far more than nailing boards to a wall. A proper job is a layered system, and each layer has a job to do. When one layer is skipped or rushed, the whole assembly loses its ability to keep water out.
A complete exterior cladding system on a Mount Pleasant home usually includes the sheathing, a water-resistive barrier, flashing at every opening, the siding material itself, and finish trim. Each piece overlaps the one below it so water always drains down and out, never in.
The core components of a siding system
- Sheathing: the structural panel that ties the wall together and gives siding something solid to fasten to.
- Weather-resistive barrier: the house wrap or building paper that sheds any water that gets past the surface.
- Flashing: metal or membrane pieces around windows, doors, and roof lines that redirect water.
- Fasteners: corrosion-resistant nails or screws rated for coastal salt exposure.
- Trim and sealant: the finishing details that close gaps and give the home its clean lines.
One of the most common mistakes we see is a homeowner focusing only on the color and brand of the board while ignoring what goes behind it. The panel looks great for a couple of years, then a leak shows up around a window because the flashing was never lapped correctly. The visible material is only as good as the details hidden underneath it.
Signs Your Home Is Ready for New Siding
Knowing when to replace siding saves you from paying twice, once for a patch and again for the full job a year later. Some warning signs are obvious. Others hide until the wall is opened up.
Homes in Mount Pleasant, Daniel Island, and Isle of Palms tend to show wear faster on the sides facing prevailing wind and salt spray. The south and west elevations usually go first, since they take the most sun and driving rain.
Warning signs you can see from the ground
- Cracking, warping, or buckling boards that no longer sit flat against the wall.
- Peeling or bubbling paint that returns quickly after you repaint.
- Soft spots you can push a finger into near the bottom courses.
- Visible gaps at seams, corners, or around windows where caulk has failed.
- Mold, mildew, or dark streaking that keeps coming back after cleaning.
Hidden problems behind the surface
The most serious issues live where you cannot see them. Rotten sheathing, rusted fasteners, and pest damage often stay hidden until removal begins. In coastal South Carolina, salt-laden air corrodes cheap nails from the inside, so siding can loosen even when it looks fine.
Homeowners often ask whether they can just wait one more season. The honest answer is that moisture damage does not pause. Once water is behind the wall, every rain event makes it worse, and the repair scope grows each month you delay. Catching it early keeps the project focused on siding instead of framing.
Choosing the Right Siding Material for the Lowcountry Climate
Material choice shapes everything that follows: how the job is installed, how long it lasts, and how much maintenance you sign up for. In the Charleston area, the deciding factors are humidity, salt exposure, wind load, and how the material handles paint over time.
As a local Siding Contractor, we steer most Mount Pleasant homeowners toward materials that shrug off moisture and insects. Here is how the common options compare for our specific climate.
| Material | Moisture Resistance | Salt Air Performance | Maintenance Level | Best Fit For |
|---|---|---|---|---|
| Fiber Cement | Excellent | Very strong | Low to moderate | Most coastal homes |
| Insulated Vinyl | Very good | Strong | Low | Budget-conscious upgrades |
| Engineered Wood | Good | Good with sealing | Moderate | Homes wanting real wood look |
| Traditional Wood | Fair | Weak without upkeep | High | Historic-match projects |
Why fiber cement dominates near the coast
Fiber cement siding resists rot, does not feed termites, and holds paint through years of humidity swings. It also carries a strong wind rating, which matters when hurricane-season gusts move up the coast toward Sullivan’s Island and Isle of Palms. The tradeoff is weight and labor, since each board is heavier and cut individually on site.
Where vinyl and engineered wood fit
Insulated vinyl adds a thermal layer behind the panel, which helps with summer cooling loads. Engineered wood gives you the deep grain of real lumber at a lower maintenance demand than solid wood. Both perform well when installed by a careful Siding Contractor who respects the manufacturer’s fastening and expansion specs.
In this region, humidity means every material needs room to expand and contract. Rushing the fastening and nailing boards too tight causes buckling once the first heat wave hits. That single detail separates siding that lays flat for decades from siding that ripples by the second summer.
The Step-by-Step Siding Installation Process
Here is what actually happens once you approve the estimate. A well-run siding installation follows a clear sequence, and each stage sets up the next. Skipping ahead is where problems start.
Step 1: On-site assessment and measurement
Everything begins with a real inspection. We measure each elevation, check for existing damage, and note every window, door, penetration, and roof intersection. This is where material quantities and flashing details get planned, not guessed.
Step 2: Tear-off and inspection of the sheathing
The old siding comes off so we can see the wall’s true condition. In coastal homes, this is often where hidden rot, soft sheathing, or pest trails show up. Any compromised sheathing gets replaced before we go further, because new siding over bad substrate is a wasted investment.
Step 3: Weather barrier and flashing
A fresh water-resistive barrier goes on, lapped correctly from bottom to top so gravity works in your favor. Flashing is installed at windows, doors, and transitions. The flashing needs full integration with the house wrap, layered so water is always directed outward. Rushing this step causes leaks that do not appear until the next heavy storm.
Step 4: Siding installation
Now the material goes up. Boards or panels are set level, fastened with corrosion-resistant nails, and spaced to allow movement. Corners, butt joints, and courses are aligned so the finished wall reads clean from the street. Proper fastener depth matters here, since overdriven nails restrict expansion and lead to cracking.
Step 5: Trim, caulk, and finishing details
Trim wraps the corners, windows, and doors to close the system. High-quality sealant fills the gaps that need sealing, while intentional drainage points stay open. This is the stage that makes the difference between a job that looks professional and one that looks patched.
Step 6: Cleanup and final walkthrough
We remove debris, run a magnetic sweep for stray nails, and walk the entire exterior with you. You see every elevation, ask questions, and confirm the work before we consider it complete.
A frequent field mistake is caulking every seam shut, including the ones designed to drain. Sealing a drainage gap traps moisture behind the wall, which is the opposite of what you want in a humid coastal environment. Knowing which gaps to close and which to leave open is a skill you only get from doing this work for years.
How Long Siding Installation Takes and What Drives the Timeline
Most single-family homes in Mount Pleasant take one to two weeks from tear-off to final trim. That range moves based on a handful of factors, and understanding them helps you plan around the project.
The main factors that affect your schedule
- Home size and stories: more wall area and height mean more staging and labor time.
- Material choice: fiber cement runs longer than vinyl because each board is cut and fastened individually.
- Hidden damage: rotten sheathing found during tear-off adds repair time before siding can go up.
- Weather: our summer thunderstorms and hurricane-season rain can pause exterior work.
- Architectural details: multiple gables, dormers, and trim lines add cut and fit time.
How weather shapes the coastal schedule
In the Lowcountry, afternoon storms roll in fast during summer. We watch the forecast closely, because installing over a wet weather barrier traps moisture inside the assembly. A responsible crew would rather lose an afternoon than seal humidity into your wall. This is why local scheduling always builds in a buffer for rain days.
Homeowners on Daniel Island and Kiawah Island sometimes ask why their neighbor’s project finished faster. The honest answer is that no two homes are the same. A simple ranch with clean elevations moves quickly, while a home with wraparound porches, multiple rooflines, and extensive trim takes longer no matter how efficient the crew is.
Permits, Codes, and Coastal Requirements
Siding replacement in the Charleston area is not a no-paperwork project. Most jobs require a permit, and several communities add another layer of review on top of the standard building code.
What local approval usually involves
A permit confirms the work meets current building standards, including wind-load requirements that matter along the coast. Many neighborhoods and island communities also require architectural or HOA approval for material and color. A licensed Siding Contractor handles the permit filing, schedules inspections, and confirms your choices meet community guidelines before the first board comes off.
Why coastal codes are stricter here
Homes in Seabrook Island, Kiawah Island, and other barrier-island areas face higher wind exposure than inland properties. That means fastening patterns, flashing details, and material ratings all face closer scrutiny. In these zones, the code requirements around wind uplift mean fasteners and installation methods are not optional preferences, they are documented specifications.
One mistake that stalls projects is starting work before HOA or architectural approval clears. The siding looks fine, then a review board requires a color change or a different profile, and the homeowner pays to redo finished work. Confirming approvals up front is far cheaper than fixing a rejection later.
Working with a licensed local team
Choosing a contractor who already knows the Mount Pleasant permitting office and the island review boards saves weeks. Familiarity with local inspectors, submittal formats, and community rules keeps the paperwork moving while the crew stays productive. It is one of the quiet advantages of hiring a team rooted in the Charleston area rather than an out-of-town outfit.
How to Choose a Siding Contractor You Can Trust
The material matters, but the installer matters more. The best fiber cement in the world fails if it is fastened wrong or flashed poorly. Here is how to separate a skilled crew from a risky one.
Questions worth asking before you sign
- Are you licensed and insured for exterior work in South Carolina?
- How do you handle rotten sheathing found during tear-off?
- What corrosion-resistant fasteners do you use for coastal conditions?
- Do you pull the permit and coordinate inspections?
- Can I see recent local projects and reviews?
You can check any contractor’s reputation and recent work through resources like our Google Business profile, where past Mount Pleasant homeowners share their experience. Real local reviews tell you more than any brochure.
Red flags to watch for
Be cautious of any bid that skips the tear-off inspection or promises to install over old siding without looking underneath. Watch for vague answers about flashing and fasteners. In salt air, using standard nails instead of corrosion-resistant ones causes rust stains and loose boards within a few seasons. A contractor who cannot explain their fastener choice has not done enough coastal work.
A detailed written scope is your best protection. It should list the material, the weather barrier, the flashing plan, the fastener type, and how hidden damage is handled. When everything is documented before work starts, there are no surprises when the wall opens up.
FAQ: Common Questions About Siding Installation in Mount Pleasant
How long does siding installation take on a Mount Pleasant home?
Most single-family homes take one to two weeks from tear-off to final trim. The timeline depends on the home’s size, the material chosen, how much rotten sheathing is found underneath, and coastal weather. Fiber cement often runs a few days longer than vinyl because each board is heavier and cut individually on site.
Can I install new siding over my existing siding?
Sometimes, but in coastal South Carolina we usually recommend a full tear-off. Going over old siding hides moisture damage, rot, and pest issues that are common near the water. A complete removal lets us inspect the sheathing, replace the weather barrier, and confirm everything is dry and solid before the new material goes on.
What siding holds up best in the Lowcountry climate?
Fiber cement is the most popular choice around Charleston because it resists moisture, salt air, insects, and high humidity while holding paint well. Insulated vinyl and engineered wood also perform when installed correctly. The real difference is installation quality and proper flashing, since our storms and salt exposure punish any weak detail.
Do I need a permit to replace siding in Mount Pleasant?
In most cases, yes. Siding replacement in the Charleston area typically requires a permit, and some neighborhoods and island communities add architectural review or HOA approval. A licensed local contractor handles the permit paperwork, schedules any required inspections, and confirms your material and color meet community guidelines before work begins.
Key Takeaways Before You Start Your Siding Project
Upgrading your siding is one of the highest-impact things you can do for a Mount Pleasant home, both for protection and curb appeal. The process is predictable when it is done right: assess, tear off, inspect, barrier, flash, install, and finish.
The details that decide success are mostly invisible from the street. Proper flashing, corrosion-resistant fasteners, correct board spacing, and a clean weather barrier are what keep water out through years of humidity and coastal storms. Material choice matters, but installation quality matters more.
If your boards are cracking, your paint keeps peeling, or you have soft spots near the ground, the wall is telling you something. Acting while the problem is still siding, before it becomes framing, keeps your project smaller, faster, and less expensive.
Schedule Your Free Siding Estimate in Mount Pleasant
Every season you wait, salt air and humidity keep working on the gaps in your current siding. If you have already spotted peeling paint or soft boards, moisture is likely moving toward the sheathing right now, and that repair only grows with time. Catching it this season keeps the job focused on cladding instead of structural work.
When you reach out, here is exactly what happens. We come to your home, inspect each elevation, check for hidden damage around windows and roof lines, and talk through the right material for your exposure. Then you get a clear written estimate with the scope spelled out, so you know what you are paying for before anyone lifts a tool.
The visit takes under an hour, and there is no obligation to move forward. You can schedule a free estimate whenever it is convenient, and we will work around your calendar and the weather.
Call us today at (843) 883-4130 to get on the schedule and protect your home before the next storm season.
Find a Trusted Siding Contractor Near You in the Charleston Area
Fortrex Charleston LLC installs and replaces siding across Mount Pleasant and the surrounding coastal communities. We know how salt air, humidity, and barrier-island wind loads affect each neighborhood, and we tailor the material and installation details to your exact location. Find your community below and reach out for a local estimate.